
一、Haproxy 实现四层负载
1、Haproxy L4 配置
[root@haproxy-lb1 ~]# /etc/haproxy/haproxy.cfg
global
    log                     127.0.0.1 local2
    chroot                  /var/lib/haproxy
    pidfile                 /var/run/haproxy.pid
    maxconn                 4000
    user                    haproxy
    group                   haproxy
    daemon

defaults
    mode                    http
    log                     global
    option                  dontlognull
    retries                 3
    maxconn                 3000
    contimeout              50000
    clitimeout              50000
    srvtimeout              50000

listen stats
    bind                    *:1314
    stats                   enable
    stats                   hide-version
    stats uri               /haproxystats
    stats realm             Haproxy\ stats
    stats auth              admin:admin
    stats admin             if TRUE

frontend web
    option                   httplog
    option                   http-server-close
    option forwardfor        except 127.0.0.0/8
    #option                  redispatch
    mode                     http
    bind                     *:80
    default_backend          httpservers

backend httpservers
    balance roundrobin
    server http1 192.168.152.10:80 check maxconn 2000
    server http2 192.168.152.20:80 check maxconn 2000
    server http3 192.168.152.30:80 check maxconn 2000

listen mysql
    bind *:3306
    mode tcp
    balance roundrobin
    server mysql1 192.168.152.40:3306 weight 1  check inter 1s rise 2 fall 2
    server mysql2 192.168.152.50:3306 weight 1  check inter 1s rise 2 fall 2
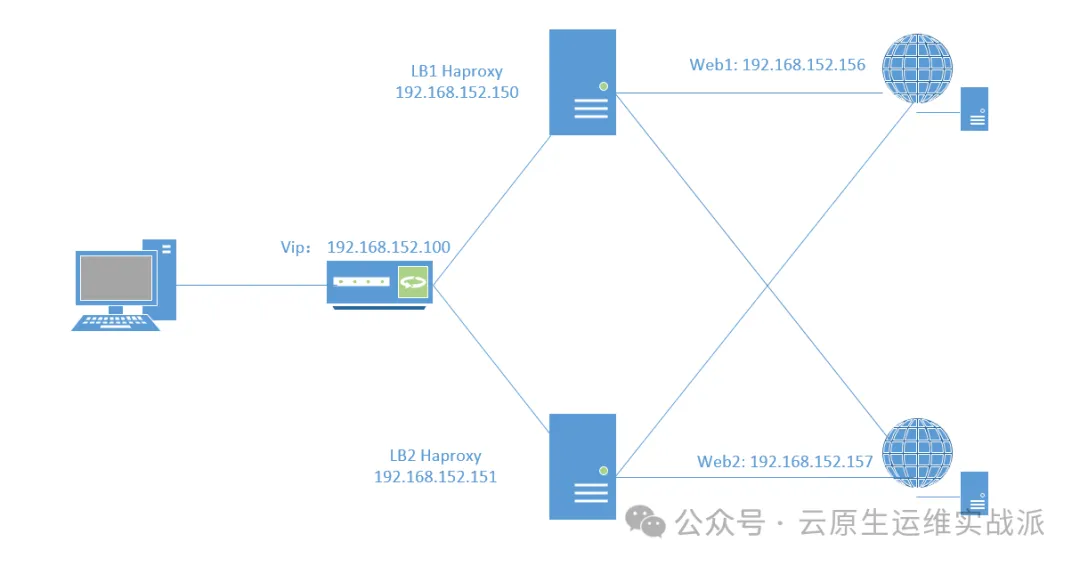
二、Haproxy + Keepalived 高可用负载均衡
1、拓扑结构
2、环境配置(集群中所有主机)
配置 :IP, hostname, hosts, firewalld, SELinux,, ntp
[root@haproxy-lb1 ~]# cat /etc/hosts
192.168.152.150	haproxy-lb1.edenluo.com active
192.168.152.151	haproxy-lb2.edenluo.com backup
192.168.152.156	web1.edenluo.com
192.168.152.157	web2.edenluo.com
3、RS 配置
配置好网站服务器,测试所有RS
4、配置 Haproxy(主/备)
[root@haproxy-lb1 ~]# yum -y install haproxy
[root@haproxy-lb1 ~]# cp -rf /etc/haproxy/haproxy.cfg{,.bak}
[root@haproxy-lb1 ~]# sed -i -r '/^[ ]*#/d;/^$/d' /etc/haproxy/haproxy.cfg
[root@haproxy-lb1 ~]# vim /etc/haproxy/haproxy.cfg
global
    log                     127.0.0.1 local2
    chroot                  /var/lib/haproxy
    pidfile                 /var/run/haproxy.pid
    maxconn                 4000
    user                    haproxy
    group                   haproxy
    daemon

defaults
    mode                     http
    log                      global
    option                   dontlognull
    retries                  3
    maxconn                  3000
    contimeout               50000
    clitimeout               50000
    srvtimeout               50000

listen stats
    bind                    *:1314
    stats                   enable
    stats                    hide-version
    stats uri               /haproxystats
    stats realm             Haproxy\ stats
    stats auth              admin:admin
    stats admin             if TRUE

frontend web
    option                   httplog
    option                   http-server-close
    option forwardfor        except 127.0.0.0/8
    #option                  redispatch
    mode                     http
    bind                     *:80
    default_backend          httpservers

backend httpservers
    balance roundrobin
    server http1 192.168.152.156:80 check maxconn 2000
    server http2 192.168.152.157:80 check maxconn 2000

[root@haproxy-lb1 ~]# systemctl enable haproxy.service --now
5、测试调度器(主/备)
[root@haproxy-lb1 ~]# curl 192.168.152.150
web1
[root@haproxy-lb1 ~]# curl 192.168.152.150
web2
[root@haproxy-lb1 ~]# curl 192.168.152.150
web1
[root@haproxy-lb1 ~]# curl 192.168.152.150
web2

[root@haproxy-lb2 ~]# curl 192.168.152.151
web1
[root@haproxy-lb2 ~]# curl 192.168.152.151
web2
[root@haproxy-lb2 ~]# curl 192.168.152.151
web1
[root@haproxy-lb2 ~]# curl 192.168.152.151
web2
6、Keepalived 实现 HAproxy HA
注:主/备调度器均能够实现正常调度
1、主/备调度器安装软件
[root@haproxy-lb1 ~]# yum -y install keepalived
2、Keepalived 配置
1、Master
[root@haproxy-lb1 ~]# vim /etc/keepalived/keepalived.conf
! Configuration File for keepalived
global_defs {
   router_id director1
}

vrrp_instance VI_1 {
    state BACKUP
    nopreempt
    interface eth0
    virtual_router_id 80
    priority 100
    advert_int 1
    authentication {
        auth_type PASS
        auth_pass 1111
    }
    virtual_ipaddress {
        192.168.152.100
    }
}
2、BACKUP
[root@haproxy-lb2 ~]# vim /etc/keepalived/keepalived.conf
! Configuration File for keepalived
global_defs {
   router_id director1
}

vrrp_instance VI_1 {
    state BACKUP
    nopreempt
    interface eth0
    virtual_router_id 80
    priority 100
    advert_int 1
    authentication {
        auth_type PASS
        auth_pass 1111
    }
    virtual_ipaddress {
        192.168.152.100
    }
}
3、启动KeepAlived(主备均启动)
[root@haproxy-lb1 ~]# systemctl restart haproxy.service
[root@haproxy-lb1 ~]# systemctl start keepalived
[root@haproxy-lb1 ~]# ip addr
7、扩展对调度器Haproxy健康检查(可选)
思路:让Keepalived以一定时间间隔执行一个外部脚本,脚本的功能是当Haproxy失败,则关闭本机的Keepalived
1、检测脚本
[root@haproxy-lb1 ~]# cat /etc/keepalived/check_haproxy_status.sh
#!/bin/bash
/usr/bin/curl -I http://localhost &>/dev/null
if [ $? -ne 0 ];then
      systemctl stop keepalived
fi
[root@haproxy-lb1 ~]# chmod a+x /etc/keepalived/check_haproxy_status.sh
2、keepalived 使用检测脚本
! Configuration File for keepalived

global_defs {
   router_id director1
}

vrrp_script check_haproxy {
   script "/etc/keepalived/check_haproxy_status.sh"
   interval 5
}

vrrp_instance VI_1 {
    state BACKUP
    interface eth0
    nopreempt
    virtual_router_id 90
    priority 100
    advert_int 1
    authentication {
        auth_type PASS
        auth_pass edenluo
    }
    virtual_ipaddress {
        192.168.152.100
    }

    track_script {
        check_haproxy
    }
}
三、Haproxy Log 配置
1、查找yum源中的 haproxy:
[root@haproxy-lb1 ~]# yum list | grep haproxy
haproxy.x86_64                            1.5.18-9.el7                   @base
pcp-pmda-haproxy.x86_64                   4.3.2-7.el7_8                  updates
2、创建日志目录
[root@haproxy-lb1 ~]# mkdir /var/log/haproxy
[root@haproxy-lb1 ~]# chmod a+w /var/log/haproxy
3、开启 rsyslog 记录 haproxy 日志:
[root@haproxy-lb1 ~]# vim /etc/rsyslog.conf
# Provides UDP syslog reception
$ModLoad imudp
$UDPServerRun 514

# Provides TCP syslog reception
$ModLoad imtcp
$InputTCPServerRun 514

# haproxy log
local0.*    /var/log/haproxy/haproxy.log  # 添加    日志级别木桶原理(谁最严格就按谁的)
4、修改 rsyslog 配置文件
[root@haproxy-lb1 ~]# vim /etc/sysconfig/rsyslog
# Options for rsyslogd
# Syslogd options are deprecated since rsyslog v3.
# If you want to use them, switch to compatibility mode 2 by "-c 2"
# See rsyslogd(8) for more details
SYSLOGD_OPTIONS="-r -m 0 -c 2"
r表示允许接收外来日志消息,x表示不需要DNS解析,m表示立即同步 0表示关闭  -c  兼容模式
5、重启 rsyslog 使日志配置生效
[root@haproxy-lb1 ~]# systemctl restart rsyslog
6、修改 haproxy 的配置文件
[root@haproxy-lb1 ~]# vim /etc/haproxy/haproxy.cfg
###########全局配置#########
    global
        log 127.0.0.1 local0 err  		# 日志类型,为不影响性能使用err
        daemon
        #nbproc 1     					# 进程数量
        maxconn 4096  					# 最大连接数
        #user haproxy  					# 运行用户
        #group haproxy 					# 运行组
        chroot      /var/lib/haproxy
        pidfile     /var/run/haproxy.pid

########默认配置############
    defaults
        log global
        mode http            			# 默认模式{ tcp|http|health }
        option httplog       			# 日志类别,采用httplog
        option dontlognull   			# 不记录健康检查日志信息
        retries 2            			# 3次连接失败就认为服务器不可用
        option forwardfor    except 127.0.0.0/8  # 后端服务获得真实ip,在HTTP请求中添加"HTTP_X_FORWARDED_FOR"字段
        option httpclose     			# 请求完毕后主动关闭http通道
        option abortonclose  			# 服务器负载很高,自动结束比较久的链接
        maxconn 10000        			# 最大连接数
        timeout connect 5m   			# 连接超时   m(分钟)
        timeout client 1m    			# 客户端超时
        timeout server 1m    			# 服务器超时
        timeout check 10s    			# 心跳检测超时  s(秒)
        balance leastconn    			# 负载均衡方式,最少连接
########统计页面配置############
    listen stats
        bind 0.0.0.0:1080        		# 监听端口,云服务器要开公网端口
        mode http                		# http的7层模式
        option httplog
        log 127.0.0.1 local0 err 		# 错误日志记录
        stats refresh 15s        		# 每隔15秒自动刷新监控页面
        maxconn 10               		# 最大连接数,同时访问stats页面的个数
        stats uri /status        		# 状态页面 http//ip:1080/status
        stats realm Haproxy\ Statistics
        stats auth admin:admin   		# 用户和密码
        stats hide-version       		# 隐藏版本信息
        stats admin if TRUE      		# 设置手工启动/禁用

########frontend前端配置##############
    frontend http_local_60_frontend
        bind *:8577
        mode http
        default_backend http_local_60_backend

########backend后端配置##############
    backend http_local_60_backend
        mode http
        server http_80 192.168.101.60:80

######## frontend 和 backend 写在一起##############
    listen tcp-frontend
        bind *:8577  		  # 监听端口,要开公网访问
        balance roundrobin     # 基于权重轮询,动态算法
        mode tcp
        option tcplog
        server tcp-backend 192.168.101.60:8577
        server tcp-backend 192.168.101.61:8577 check 		# 对当前server做健康状态检测
        server tcp-backend 192.168.101.62:8577 check backup  # backup 设定当前server为备用服务器
7、检查 haproxy 日志配置是否有效
[root@haproxy-lb1 ~]# haproxy -c -f /etc/haproxy/haproxy.cfg

...
Configuration file is valid  # 有效,警告可以处理,一般都是 log类型,option tcplog, http的option forwardfor启动haproxy:
8、重启 haproxy
[root@haproxy-lb1 ~]# systemctl start haproxy.service
9、查看bind监听端口
[root@haproxy-lb1 ~]# netstat -tunlp
10、验证日志记录
[root@haproxy-lb1 ~]# tcpdump -i lo -nn port 514
[root@haproxy-lb1 ~]# netstat -tunlp |grep :514
[root@haproxy-lb1 ~]# tailf /var/log/haproxy.log
11、查看主/备调度器组播状态
正常只有活跃的调度器发送组播
[root@hap-lb1 ~]# tcpdump -i eth0 -nn vrrp
四、haproxy 扩展配置
1、压缩设置
- compression algo #启用http协议中的压缩机制,常用算法有gzip deflate
- compression type #要压缩的类型
示例:
记录host和浏览器类型
listen test
  bind 192.168.1.10:80
  mode http
  compression algo gzip deflate
  compression type text/plain text/html text/css text/xml text/javascript application/javascript
  server testweb1 192.168.1.12:80
  server testweb2 192.168.1.13:80
2、三种状态监测
1、基于四层的传输端口做状态监测(可用TCP模式)
listen test
  bind 192.168.1.10:80
  mode http
  server testweb1 192.168.1.12:80 check inter 3000 fall 3 rise 5
2、基于指定URI 做状态监测
listen test
  bind 192.168.1.10:80
  mode http
  option httpchk GET /a.html HTTP/1.0
  server testweb1 192.168.1.12:80
  server testweb2 192.168.1.13:80
3、基于指定URI的request请求头部内容做状态监测
listen test
  bind 192.168.1.10:80
  mode http
  #option httpchk GET /a.html HTTP/1.0
  #还可以添加其他信息比如声明发起请求的地址
  option httpchk GET /a.html HTTP/1.0\r\nHost:\192.168.1.10
  server testweb1 192.168.1.12:80
  server testweb2 192.168.1.13:80
3、ACL 访问控制列表
ACL:对接收到的报文进行匹配和过滤,基于请求报文头部中的源地址、源端口、目标地址、目标端口、请求方法、URL、文件后缀等信息内容进行匹配并执行进一步操作。
acl <aclname> <criterion> [flags] [operator] [<value>]
acl 名称 条件 条件标记位 具体操作符 操作对象类型

ACL名称,可以使用大字母A-Z、小写字母a-z、冒号:、点.、中横线和下划线,并且严格区分大小写,必须Image_site和image_site完全是两个acl。

ACL derivatives :
hdr([<name> [,<occ>]]):完全匹配字符串
hdr_beg([<name> [,<occ>]]):前缀匹配
hdr_dir([<name> [,<occ>]]):路径匹配
hdr_dom([<name> [,<occ>]]):域匹配
hdr_end([<name> [,<occ>]]):后缀匹配
hdr_len([<name> [,<occ>]]):长度匹配
hdr_reg([<name> [,<occ>]]):正则表达式匹配
hdr_sub([<name> [,<occ>]]):子串匹配

[criterion]匹配条件:
dst 目标IP
dst_port 目标PORT
src 源IP
src_port 源PORT
hdr <string>用于测试请求头部首部指定内容
hdr_dom(host) 请求的host名称,如 www.test.com
hdr_beg(host) 请求的host开头,如 www. img. video. download. ftp.
hdr_end(host) 请求的host结尾,如 .com .net .cn
path_beg 请求的URL开头,如/static、/images、/img、/css
path_end 请求的URL中资源的结尾,如 .gif .png .css .js .jpg .jpeg

[flags]条件标记:
-i 不区分大小写
-m 使用指定的pattern匹配方法
-n 不做DNS解析
-u 禁止acl重名,否则多个同名ACL匹配或关系

[operator]操作符:
整数比较:eq、ge、gt、le、lt

字符比较:
exact match (-m str) :字符串必须完全匹配模式
substring match (-m sub) :在提取的字符串中查找模式,如果其中任何一个被发现,ACL将匹配
prefix match (-m beg) :在提取的字符串首部中查找模式,如果其中任何一个被发现,ACL将匹配
suffix match (-m end) :将模式与提取字符串的尾部进行比较,如果其中任何一个匹配,则ACL进行匹配
subdir match (-m dir) :查看提取出来的用斜线分隔(“/”)的字符串,如果其中任何一个匹配,则ACL进行匹配
domain match (-m dom) :查找提取的用点(“.”)分隔字符串,如果其中任何一个匹配,则ACL进行匹配

[value]的类型:
Boolean #布尔值false,true
integer or integer range #整数或整数范围,比如用于匹配端口范围,1024~32768
IP address / network #IP地址或IP范围, 192.168.0.1 ,192.168.0.1/24
string
exact #精确比较
substring #子串 例如www.test.com不论匹配www还是test或者com都生效
suffix #后缀比较
prefix #前缀比较
subdir #路径
domain #域名
regular expression #正则表达式
hex block #16进制
示例:
listen test
  bind 192.168.1.10:80
  mode http
  acl www_test hdr_dom(host) www.test.com  #多个匹配可用空格隔开
  acl m_test hdr_dom(host) m.test.com
  use_backend pc_web if www_test
  use_backend m_web if m_test
  #或的写法
  use_backend m_web if www_test || m_test

backend pc_web
  mode http
  server testweb1 192.168.1.11:80 check port 80 inter 3000 fall 3 rise 5

backend m_web
  mode http
  server testweb1 192.168.1.12:80 check port 80 inter 3000 fall 3 rise 5
1、ACL域名匹配
listen test
  bind 192.168.1.10:80
  mode http
  acl test_host hdr_dom(host) -i www.test.com
  use_backend pc_web if test_host
  default_backend m_web

backend pc_web
  mode http
  server testweb1 192.168.1.11:80 check port 80 inter 3000 fall 3 rise 5

backend m_web
  mode http
  server testweb1 192.168.1.12:80 check port 80 inter 3000 fall 3 rise 5
2、ACL源地址子网匹配
listen test
  bind 192.168.1.10:80
  mode http
  acl ip_test src 192.168.0.0/24
  use_backend pc_web if ip_test
  default_backend m_web


backend pc_web
  mode http
  server testweb1 192.168.1.11:80 check port 80 inter 3000 fall 3 rise 5

backend m_web
  mode http
  server testweb1 192.168.1.12:80 check port 80 inter 3000 fall 3 rise 5
3、ACL源地址访问控制
listen test
  bind 192.168.1.10:80
  mode http
  acl ip_test src 192.168.1.100 192.168.1.101
  block if ip_test
  default_backend pc_web


backend pc_web
  mode http
  server testweb1 192.168.1.11:80 check port 80 inter 3000 fall 3 rise 5
4、ACL匹配浏览器重定向
listen test
  bind 192.168.1.10:80
  mode http
  acl redirect_test hdr(User-Agent) -m sub -i "Chrome"
  redirect prefix http://192.168.1.101 if redirect_test
  #也可以根据域名重定向
  acl test_host hdr_dom(host) -i www.test.com
  redirect prefix http://www.text.net if test_host
  default_backend pc_web


backend pc_web
  mode http
  server testweb1 192.168.1.11:80 check port 80 inter 3000 fall 3 rise 5
5、使用ACL和文件后缀实现动静分离
listen test
  bind 192.168.1.10:80
  mode http
  acl php_server path_end -i .php
  acl image_server path_end -i .jpg .png .jpeg .gif
  use_backend php_web if php_server
  use_backend img_web if image_server


backend php_web
  mode http
  server testweb1 192.168.1.11:80 check port 80 inter 3000 fall 3 rise 5

backend img_web
  mode http
  server testweb1 192.168.1.12:80 check port 80 inter 3000 fall 3 rise 5
6、ACL匹配访问路径
listen test
  bind 192.168.1.10:80
  mode http
  acl php_server path_end -i .php
  acl static_path path_beg -i /static /images /javascript
  use_backend php_web if php_server
  use_backend img_web if static_path


backend php_web
  mode http
  server testweb1 192.168.1.11:80 check port 80 inter 3000 fall 3 rise 5

backend img_web
  mode http
  server testweb1 192.168.1.12:80 check port 80 inter 3000 fall 3 rise 5
7、ACL基于策略的访问控制
listen test
  bind 192.168.1.10:80
  mode http
  acl badguy_deny src 192.168.1.101
  http-request deny if badguy_deny
  http-request allow
  default_backend pc_web


backend pc_web
  mode http
  server testweb1 192.168.1.11:80 check port 80 inter 3000 fall 3 rise 5
4、自定义错误页面
配置通常放在defaults中
default
errorfile 500 /usr/local/haproxy/html/500.html        # 重定向到本地错误页面文件
errorloc 403 http://192.168.1.101/error_page/403.html # 重定向到某个服务器的错误页面
5、HTTPS配置
由于haproxy证书文件只能使用一个,需要先合并成一个文件
cat demo.crt demo.key > demo.pem
listen test_80
  bind 192.168.1.10:80
  mode http
  redirect scheme https if !{ ssl_fc }
  server testweb1 192.168.1.11:80 check port 80 inter 3000 fall 3 rise 5

listen test_443
  bind 192.168.1.10:443 ssl ctr /usr/local/haproxy/certs/demo.pem
  mode http #这里改成TCP也不影响访问,但如果要在头部添加信息只能是HTTP
  server testweb1 192.168.1.11:80 check port 80 inter 3000 fall 3 rise 5

 向后端服务器传递端口和协议
  listen test_443
  bind 192.168.1.10:443 ssl ctr /usr/local/haproxy/certs/demo.pem
  mode http
  http-request set-header X-Forwarded-Port %[dst_port]
  http-request add-header X-Forwarded-Proto https if { ssl_fc }
  server testweb1 192.168.1.11:80 check port 80 inter 3000 fall 3 rise 5
6、动态上下线
需要安装socat工具
yum install socat

测试显示状态
echo "show info" | socat stdio /var/lib/haproxy/haproxy.sock

服务器下线

示例配置
backend pc_web
  mode http
  server testweb1 192.168.1.11:80 check port 80 inter 3000 fall 3 rise 5
  server testweb1 192.168.1.12:80 check port 80 inter 3000 fall 3 rise 5

其中pc_web对应上面组的名称,testweb1对应服务器的名称
可以把服务器名称直接写IP方便动态上下线时使用
echo "disable server pc_web/testweb1" | socat stdio /var/lib/haproxy/haproxy.sock

backend pc_web
  mode http
  server 192.168.1.11 192.168.1.11:80 check port 80 inter 3000 fall 3 rise 5
  server 192.168.1.12 192.168.1.12:80 check port 80 inter 3000 fall 3 rise 5
echo "disable server pc_web/192.168.1.11" | socat stdio /var/lib/haproxy/haproxy.sock

在多线程的配置下,会出现其中一个进程里服务器已下线而其他进程还没下线的情况。
需要给每一个进程绑定一个sock文件
示例:
stats socket /var/lib/haproxy/haproxy.sock1 mode 600 level admin process 1
stats socket /var/lib/haproxy/haproxy.sock2 mode 600 level admin process 2


评论区